
Mar 30, 2014
Monthly Mani Favorites: March 2014
It's end of Feburary 2014 and time to choose the Montly Mani Favorites again. You can see last month's poll here. In case you haven't done this before, this is your chance to take the poll below and let me know of your favorite nail art from the month gone by. Hurry up as the poll lasts only for few days.

Mar 28, 2014
Love & Beauty by Forever 21
Do you ever shop at Forever 21? If so you definitely must have spotted their nail polishes Love and Beauty by Forever 21. These polishes are priced at $2.80. Pretty reasonable I must say. I got one of the Love and Beauty polish/shimmer called baby blue/hot pink which is a glitter polish. Since this polish's base was sheer jelly baby blue, I applied it on top of a white polish and the outcome was this amazing baby blue polish with silver and pink glitter with some tiny blue glitter as well.


The only thing disappointing about this polish is the polish in the bottle dried up very fast in couple of months. So if you really really like this polish buy it and use it a few times or get a really good nail polish thinner :) I liked the polish but wasn't impressed with it not lasting for long in the bottle.


The only thing disappointing about this polish is the polish in the bottle dried up very fast in couple of months. So if you really really like this polish buy it and use it a few times or get a really good nail polish thinner :) I liked the polish but wasn't impressed with it not lasting for long in the bottle.
Mar 26, 2014
Lavender n mint
Hi all, today I am sharing with you all my first nail art from year 2014. That's right this is the nail art I did when I got myself some time in January 2014.

I started with a coat of a base polish. On top of it I added two coats of OPI's Do You Liliac It polish. Then when it was dry I diagonally added Revlon's Jaded and some white lines using OPI's My boyfriend scales the walls.

The outcome looks good and I like how the two colors compliment each other. A good start for nail art for the year 2014 ;)

Mar 24, 2014
Retro with a twist
I love Retro colorblock nails. Not only there is the challenge of getting the colors in the blocks but also I like the pop of different colors together in this nail art. You can see the previous Retro nails that I have done here and here

So today I am sharing another Retro colorblock nail art with you all. This design is inspired by Sophie. You can see previous design inspired by her here.

What is different in this nail art from the other retro ones that I have done you ask? It's the use of stripping tape on the nails and incorporating them as part of the nail art. I wouldn't lie it was the most difficult nail art I did till date and took me an hour to complete it. The only reason was using the stripping tape and placing it back exactly on the lines and cutting it correctly to form the blocks. Only issue at the end was the stripping tape started curling at the ends, as you can see in some pictures and I didn't like that at all. Then why am I sharing it with you all? Coz it took so much time finishing this nail art and it at least needs a good mention on my blog here. That's why you see lack of proper clean up in some pics.

Nevertheless my dear hubby liked these nails an decided to take some macro shots with some water droplets on my nails for his personal collection :) So here is a picture of that as well. Must say it makes the nail art look much better :)

Mar 21, 2014
Neon and Black
Neon polish is hard to wear in day to day life coz the nails are super neon-ish and attract a lot of attention, not that it is a bad thing but I would rather wear neon nails on vacation. And that's what I did on a recent weekend getaway, I painted my nails in neon yellow and added some funky nail art to go with it, in the colors that would compliment neon.
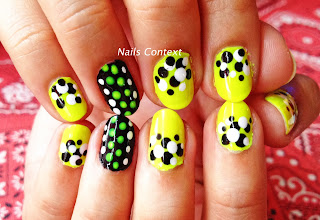
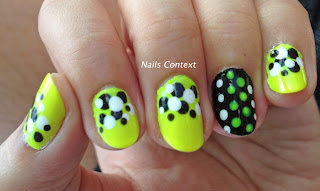
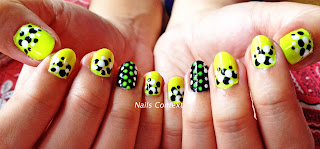
The polishes that I have used are - Neon is Claire's Sunshine, Black is Maybelline's Onyx Rush and White is SinfulColor's Snow Me White.
Did you like this all neon polish? If so let me know in the comments below.


The polishes that I have used are - Neon is Claire's Sunshine, Black is Maybelline's Onyx Rush and White is SinfulColor's Snow Me White.
Did you like this all neon polish? If so let me know in the comments below.
Mar 19, 2014
OPI Muppets Most Wanted
OPI came out with their new collection this month called OPI Muppets Most Wanted. This collection is based of the movie Muppets Most Wanted which released last week. So last week while shopping at Ulta store I came across this collection and immediately fell in love with Gaining Mole-mentum glitter polish which is part of this collection.
 Gaining Mole-mentum is a shredded glitter polish which has gold, silver and rose gold metallic shreds in a clear base. I applied one coat of this glitter over a nude polish called "Naturally Cream" from Maybelline's new nude collection and the effect was amazing. It was easy to get the glitter out of the polish bottle and in one coat you can see how much glitter I got out of the bottle.
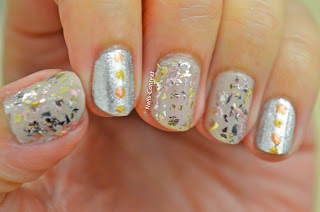 I didn't wanted to apply the glitter on all the nails but keeping the metallic theme here, I painted the other nails with silver polish from OPI called Haven't The Foggiest and added some metallic dots to it.
 This is an amazing glitter polish, very unique and definitely a keeper. Instead of using loose flakes, I would definitely use this. Yay!!! for OPI for coming out with such awesome glitter polish.


Mar 17, 2014
Festival Nailart: St. Patrick's Day 2014
Happy St. Patrick's Day everyone. Today on the occasion of St. Patrick's Day, I am sharing my Shamrock green nail art with you all.
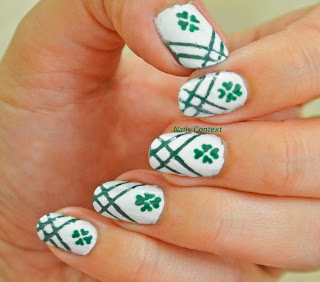 I started this nail art by painting my nails in the base color of OPI's Jade Is The New Black. Once it was dry I placed stripping tape in the pattern of the green lines you see in the nail art. On top of that I painted with OPI's My Boyfriend Scales The Walls and immediately took out the stripping tape leaving the pattern of green lines. Once the white polish was dry using a dotting tool I added the Shamrock as the four leaves using again OPI's Jade Is The New Black and sealed it with my favorite top coat. That's it.
 This nail art is perfect for St. Patrick's Day and I love how the Shamrock's turned out.
 Enjoy and hope you are wearing green today :)


Mar 16, 2014
Festival Nailart: Happy Holi 2014
Happy Holi everyone !!! Today as in India we celebrate the festival of colors, I share with you all my nail art inspired by this festival.
 Holi is a festival which is celebrated in spring every year. Holi celebrations start with a Holika bonfire on the night before Holi where people gather, sing and dance. The next morning is a carnival of colors where people chase each other with colors in their hands and color each other with dry powder and colored water. There are some water balloon fights involved as well. People usually wear white on this day but by late morning, everyone looks like a canvas of colors.
 My nail art depicts the same. It shows the splash of colors on white, the accent finger shows pichkari(water gun used for Holi) with color splashing out of it.
 Hope you all have a fun filled colorful Holi this year and stay out of trouble ;) HAPPY HOLI.


Mar 14, 2014
Product of the Week - Butter London's Backstage Basics Set
Hi All. From today on I am starting a new series called "Product of the Week". In this series I will be sharing the amazing products or hard to resist deals that I will come across on my shopping trips (mostly nail art related, unless I really get excited about something ;P ).
So to start with I am sharing my first "Ah-ma-zing" find. I found this awesome product from Butter London called 'Backstage Basics' Customizable Set while shopping at Ulta store earlier this week. Why is it amazing? I tell you why. Now if you are familiar with Butter London products you would know their polishes are 3 Free: no formaldehyde, no toluene, no DBP (dibutyl phthalate) and are usually priced $15. Butter London also carries Top and Base coats which are priced $19 each.
Now the fun thing about this 'Backstage Basics' Customizable Set is that, it includes Nail Foundation Flawless Basecoat and Hardwear P.D. Quick Topcoat, Powder Room Acetone Free Lacquer Remover, and a complimentary nail file. The reason it is "Customizable" is because you can also add a Butter London polish of your choice in this set, all for only $29.
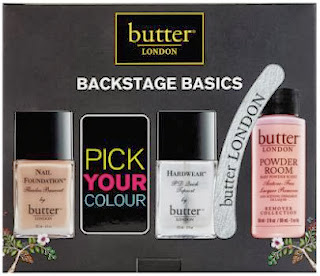
Now I personally love their Base coat and Top coat. And that's what I use for all my nail art's and manicure. And if you follow my nail art closely, you would have noticed that I use Butter London's Cotton Bud white polish in most of my nail art's where white is needed. So this was a steal for me, not to mention I was buying this set for the second time :) So if you want to try out their base coat and top coat, I would definitely recommend this product.
This set is available at Ulta stores and Nordstrom stores.
How do you all like this new series? Would you like to see more products like the above, in future? Then let me know in the comments section below.
Mar 12, 2014
Got featured on NailIt Magazine's webpage today - AGAIN!!!
I am really excited to announce that my floral nail art got featured in 11 Floral nail arts on Nail It magazine's web page today again.
To see it online head over to Nail It mag's web page. And to see my original post, please head over here. Below is the picture on the web page.

Here is what NailIt magazine had to say about the spring floral mani's - "Spring is in the air, and one of our latest Snapshot themes in Nail It’s March/April issue was floral nails! We asked readers to send in their favorite rendition of flowers, and here’s a few lovelies that caught our eye."
Last time I was featured on their web page in Nov 2013. You can read about it here.
Mar 11, 2014
Simple yet elegant
These days my creativity has gone on a vacation and I cannot come up with any exciting new nail art designs. So this past Sunday, I sat scratching my head to come up with a new and unique design but this is all I came up with. It's not a unique design but I haven't seen anyone do this before either. So here it is.
 For this I used OPI's DS polish called DS Reserve.

 You can see my other nail art using DS Reserve here and here.
 Below is a picture of the nail art which is taken in sunlight, to show you all how lovely DS Reserve looks in sunlight and the way it sparkles. JUST LOVELY.
 Hope you all like it.


Mar 9, 2014
Coral Love
There was a time when I didn't like Coral color at all. Now lately I have been liking this color a lot and incorporating it more in my wardrobe and day to day life. Now my day to day life includes nail art and how could that be left behind without a beautiful shade of Coral. Now you must remember me talking about this lovely Coral shade from Charlotte Russe some time ago. So using this same polish I created this nail art.
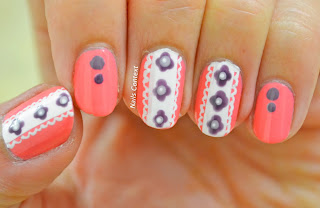
For this nail art I began by painting my nails with the base color of the coral polish. When it was little dry, using the nail poilsh brush itself I added broad white lines using Sally Hansen's Hard To Get. On top of that using a dotting tool I created flowers from two different shades of purple. Then along the white lines I added some lace pattern. The hardest part about this nail art was doing the intricate lace pattern along the white lines, it took a long time as it was very detailed.
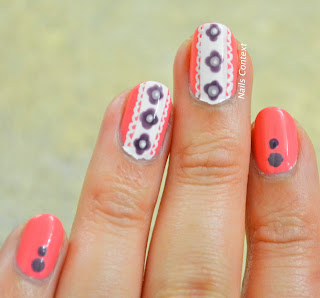
To see the inspiration behind these nails, head over to my Instagram page.

You can also see the previous coral nails here.
Mar 7, 2014
Moonraker and dots
Moonraker is a polish from OPI's Skyfall Collection from Winter 2012. It is a lovely silvery grey polish and you can see it's swatch here. So I decided to go ahead and do a nail art with this pretty polish.

I started with applying two coats of Moonraker by OPI for the base coat. On top of it, using a dotting tool I added different shapes of black dots. Then on the bigger dots I added tiny silver dots. That's it easy peasy.

I like the silver, grey and black effect in this design. It kinda reminds me of some animal print...not sure which one.
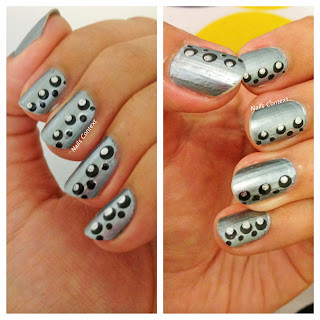
Hope you like this fabulous shade as well.
Mar 5, 2014
Nail Art Water Decals
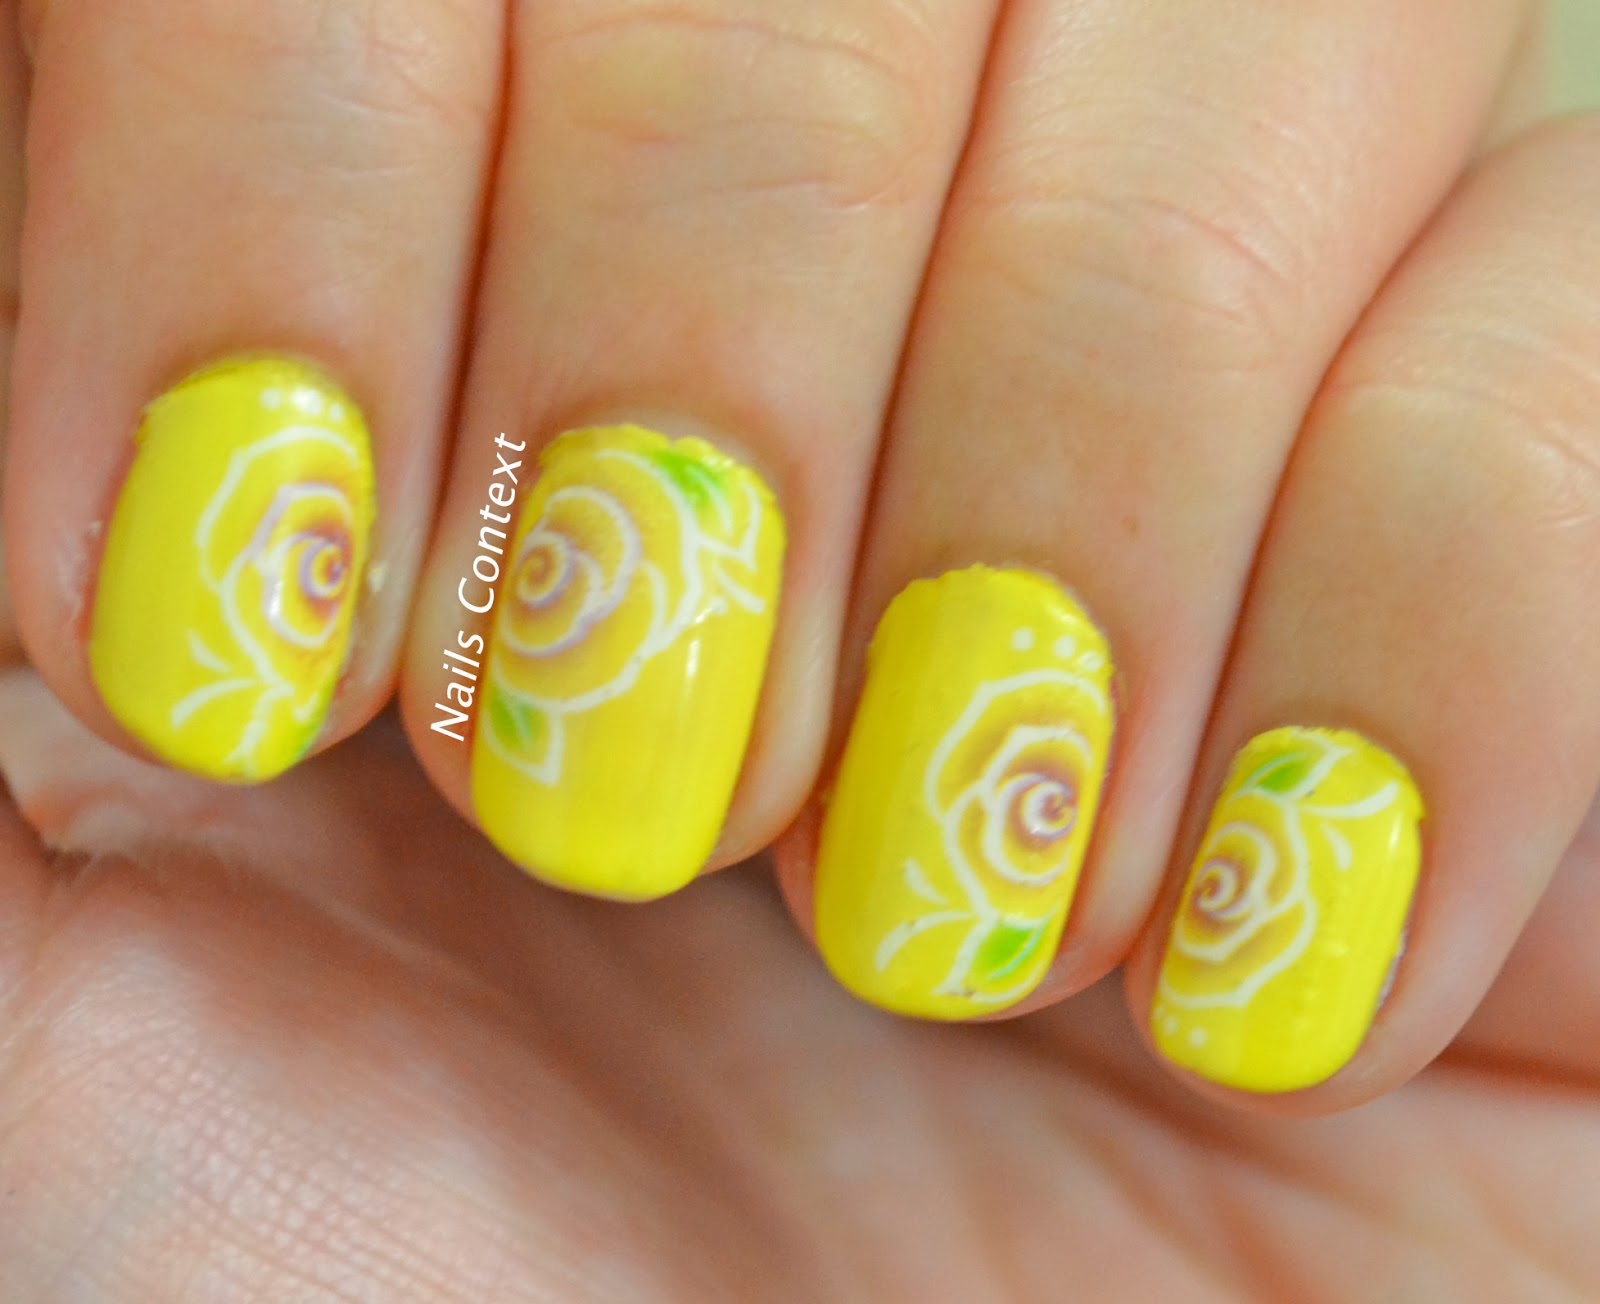
While browsing through Born Pretty Store's website, I came across some very pretty water Nail Art Decals. I had never tried decals before, so decided to buy me some pretty designs and review them for you all as well.
I got a set of 20 water nail art decal's for $2.86. It took almost 3-4 weeks for them to reach to me which was really frustrating. But once I received these, all was forgiven.

To apply them is really easy. You have to follow the instructions on the back of the package. First apply the nail polish that you want as the background for these designs and let it dry completely. I used Sally Hansen's Mellow Yellow. Then cut out each design you want to apply on each nail. So I cut out 10 flowers. Then one nail at a time, I put one cutout in a cup of water and let it soak for 10-15 seconds, after which the decal design came out by itself. Then I carefully applied it to the nail and let it stick and dry completely. I sealed it with my favorite top coat. Then repeated the process for rest of the nails.

I really like these decals. They are easy to use and very quickly create some gorgeous nail art on your nails. Most of the girls/women I meet admire my nails but don't have patience or are too lazy to do the nail art by themselves. These are the women who are looking for someone(read ME) to do nail art for them, that too for free. So if you are not one of those lazy women and really really want some pretty nail art on your finger tips without spending a lot of money, nail art decals are the technique for you.

If you really liked this post and would want to try this technique then try the above mentioned website. You can see another of my Born Pretty Store find here. To get 10% odd your order from BornPrettyStore, use the code QANX31 at checkout.
I got a set of 20 water nail art decal's for $2.86. It took almost 3-4 weeks for them to reach to me which was really frustrating. But once I received these, all was forgiven.
To apply them is really easy. You have to follow the instructions on the back of the package. First apply the nail polish that you want as the background for these designs and let it dry completely. I used Sally Hansen's Mellow Yellow. Then cut out each design you want to apply on each nail. So I cut out 10 flowers. Then one nail at a time, I put one cutout in a cup of water and let it soak for 10-15 seconds, after which the decal design came out by itself. Then I carefully applied it to the nail and let it stick and dry completely. I sealed it with my favorite top coat. Then repeated the process for rest of the nails.

I really like these decals. They are easy to use and very quickly create some gorgeous nail art on your nails. Most of the girls/women I meet admire my nails but don't have patience or are too lazy to do the nail art by themselves. These are the women who are looking for someone(read ME) to do nail art for them, that too for free. So if you are not one of those lazy women and really really want some pretty nail art on your finger tips without spending a lot of money, nail art decals are the technique for you.

If you really liked this post and would want to try this technique then try the above mentioned website. You can see another of my Born Pretty Store find here. To get 10% odd your order from BornPrettyStore, use the code QANX31 at checkout.
Mar 3, 2014
Henna Series: Simple Design
Hi everyone, it's been a while since I have posted any of my henna designs. So today's post is about a simple henna design that I did recently, only on my palm. This time I didn't do it on back of my hand. Below are some pictures of the henna design while it was still fresh on my hands, hence the black color.

 After the henna dries out and falls, it leaves a reddish-orange design on your hand, so below are the pictures of the design the next day.

 You can see the previous henna designs here, here and here. Below is a picture of me working on the design at the beginning.

Hope you all like this distraction from the everyday nail posts. Let me know in the comments below if you would like to see more henna designs on the blog.


Hope you all like this distraction from the everyday nail posts. Let me know in the comments below if you would like to see more henna designs on the blog.
Subscribe to:
Posts (Atom)