
Feb 28, 2014
Monthly Mani Favorites: Feb 2014
It's end of Feburary 2014 and time to choose the Montly Mani Favorites again. You can see last month's poll here. In case you haven't done this before, this is your chance to take the poll below and let me know of your favorite nail art from the month gone by. Hurry up as the poll lasts only for few days.

Feb 26, 2014
Red n Gold
Today I am sharing with you all a nail art which I did more than a year ago, for an Indian festival, that's why you see all that Indian jewelry and finery in the pictures :) It's a simple nail art with a flower and some tiny glitter.
Polishes used are: Red - Ulta's Red Carpet Red, Orange is OPI's On the same Paige, Gold is Revlon's Golden and Gold Glitter is Sephora By OPI's Only Gold For Me.


Enjoy!!!
Polishes used are: Red - Ulta's Red Carpet Red, Orange is OPI's On the same Paige, Gold is Revlon's Golden and Gold Glitter is Sephora By OPI's Only Gold For Me.


Enjoy!!!
Feb 24, 2014
Freehand Chevron Pattern
You all remember my Chevron nail art. This time for the chevron mani, instead of using tape to create chevron pattern, I freehanded it. It was easy to do and I was done quickly. The polishes that I have used are both Sally Hansen's - Hard to Get and Mellow Yellow. The glitter polish is Maybelline's Gilded Rose.


Feb 21, 2014
Sweet Color Flake Polish
Today I am presenting you all with swatch of a gorgeous polish that I ordered recently. While browsing through Born Pretty Store online, I came across this beautiful multichromatic flakie glitter from Sweet Color polish. I immediately fell in love with it and couldn't resist buying it. This is a perfect and different glitter to add to my polish collection.

There are a different Sweet Color flakies available but I chose the Sweet Color Shade #4 (I wish they had better names to identify the polishes...) which looked most interesting among all due to its multichromatic nature.

For the pictures below I applied the Sweet Color flake polish on a royal blue polish so that the flakes are visible more easily in a dark background. When you move around your nails in light, these flakes change color and it makes them look gorgeous.

I purchased this bottle for $9.99 (sale price) online on Born Pretty Store. If you want more details for this polish you can leave your queries in the comments section below. To get 10% odd your order from BornPrettyStore, use the code QANX31 at checkout.

Enjoy!!!
Feb 20, 2014
Pedicure
Did I mention that my niece Esha loves my nail art? and everytime I visit her she wants me to paint her toe nails. So this past long weekend when I was visiting her, she wanted me to paint her toe nails neon orange. Not only I painted her toe nails in neon orange by Orly, I also added some fun nail art to it. Also I painted my sister's nails in pretty red polish with some nail art. Below is a picture of both which I took from my iphone.

If you want to see more nail art which I did for my sister, on here toes, you can click here.

If you want to see more nail art which I did for my sister, on here toes, you can click here.
Feb 19, 2014
Orange Dotticure
I see nail art inspirations everywhere...in flowers, in movies, in fabrics, in paintings, etc etc. I also see nail art inspirations in fellow bloggers work. Some of them are so good that sometimes I can't help but recreate their exact nail art (You have seen that happen here and here). The nail art that I am sharing with you all today is one of those which I recreated after an inspiration from my favorite nail art blogger Sophie.
This nail art was really easy to recreate. The polishes that I have used here are - OPI's On the same Paige, Charlotte Russe's Orange Creme and Sally Hansen's Hard to Get.


Hope you like it.
This nail art was really easy to recreate. The polishes that I have used here are - OPI's On the same Paige, Charlotte Russe's Orange Creme and Sally Hansen's Hard to Get.


Hope you like it.
Feb 17, 2014
Pantone's Color of the Year 2014 - Radiant Orchid
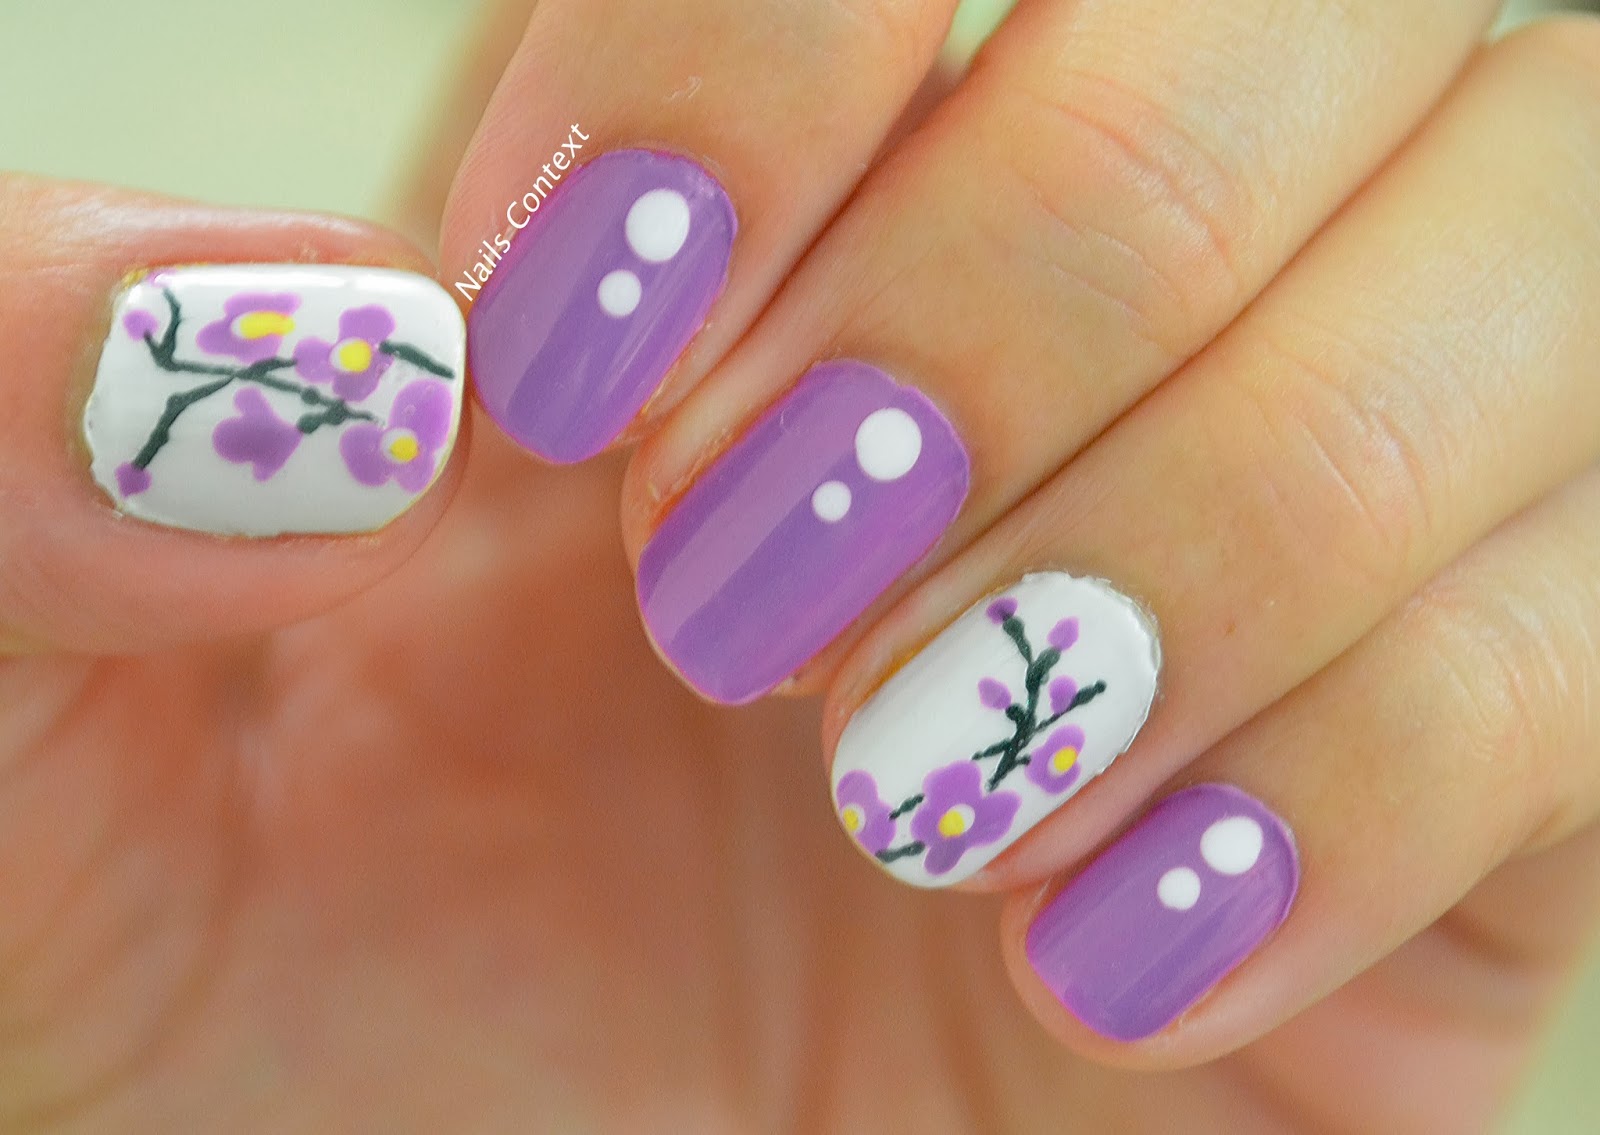
In December 2013, Pantone announced the color of the year for 2014 - Radiant Orchid. Radiant Orchid, in the words of Pantone is “An enchanting harmony of fuchsia, purple and pink undertones, Radiant Orchid inspires confidence and emanates great joy, love and health. It is a captivating purple, one that draws you in with its beguiling charm.”
I personally love this shade and have a number of pink's, mauve's and purple's in my nail polish collection. So I decided to use the polish closest to Radiant Orchid in my collection and create a nail art out of it. I chose "Parlez-vous OPI?" from OPI which is a lovely purple. For ascent nails I decided to paint freehand flowers.


Hope you all like it and enjoy my take on Pantone's color of the year 2014 - Radiant Orchid.
Feb 14, 2014
Valentines Series: Happy Valentines Day
Happy Valentine's Day everyone. Today I am sharing with you all, a pretty and pink Valentines nail art. I love the hearts print in the middle two nails and how it turned out. The polishes that I have used here are - Red is Chanel's Dragon, Pink is Revlon's Cupid and White is Butter London's Cotton Buds.


Hope you all have a wonderful Valentine's Day.


Hope you all have a wonderful Valentine's Day.
Feb 12, 2014
Valentines Series: Valentine's Colorblock
Today the nail art I am sharing with you is another of my Valentine's Day design :)

For this design I started with base coat of OPI's My Boyfriend Scales the Walls. When the polish was dry I applied stripping tape to my nails, spacing them out differently. Then on the blocks created by the stripping tape I painted OPI's Mod About You and Essie's Mink Muffs ( which reminds me of chocolate :) on a Valentine's Day ). I removed the stripping tape right away and that way perfect color blocks where created. Once all the polish was dry I added tiny hearts using Revlon's Plum Seduction and then applied the top coat. That's It :) If you would like to see the tutorial for this nail art let me know in the comments section below.

You can see a similar nail art that I did before here.

If you haven't already, then start following Nails Context on Facebook and Instagram.

Feb 10, 2014
Valentines Series: Red White and Black
Today's nail art is a new and different take on Valentine's Day. Instead of presenting you with usual pink and red Valentine's Day manicure, I decided to try something different. Hence this design with these colors.
The polishes that I have used are - Maybelline's Onyx Rush, Butter London's Cotton Buds and OPI's The Spy Who Loved Me


Hope you all like this break from usual pink for Valentine's Day.
The polishes that I have used are - Maybelline's Onyx Rush, Butter London's Cotton Buds and OPI's The Spy Who Loved Me


Hope you all like this break from usual pink for Valentine's Day.
Feb 7, 2014
Valentines Series: Hearts Glitter
Another nail art that you can do for Valentines Day, is by adding hearts glitter to your normal polish and that’s exactly what I did here. The base coat that I used is OPI’s Parlez-vous and the hearts glitter is from Nichole by OPI’s Love Your Life. Since the base of the glitter is pink, I decided to use purple as the base coat which makes the pink hearts pop out.


Feb 5, 2014
Valentines Series: Pictorial using Revlon's Stencils
Hello Friends, today's nail art post is my first Pictorial to show how I did the nail art, which was posted yesterday. As I mentioned yesterday, the hearts in the nail art were created by using the Nail art stencils from Revlon. The dots where created by using a dotting tool.

For this manicure you will need -
1. Nail art Stencils.
2. Dotting tool (if you don't have a dotting tool you can use either a tooth pick or ends of a bobby pin).
3. 2-3 nail polishes (The polishes that I have used here are - Red is Chanel's Dragon, Pink is Revlon's Cupid and White is Butter London's Cotton Buds).
4. Top Coat.
Here is a picture of the heart stencils from Revlon, I bought from nearest drug store.

Step 1 - To start first paint your nails with a polish that you want to use as a base coat. Make sure it dries completely, before you attempt Step 2.

Step 2. Take out the Stencil and apply it on the nail. Make sure it is fully sticking to the nail else it will create a lot of mess and the stencil's design will not come properly on the nail.

Step 3. Once the stencil is sticking to the nail, using a different color polish, now paint on top of the design on the stencil.

Step 4. Without waiting for a long time, carefully take out the stencil from the nail and Voila, the design is imprinted on your nail :)

Step 5. Now on a different nail using the dotting tool apply random dots on the nail. You can mix and match the designs. As you can see I did the stencil nail art on 2 nails and dots on 3.

Step 6. Once all the nail art is dry, seal it with your favorite top coat. That's it, easy peasy, isn't it.

If you liked this pictorial and would like to see more of these for other nail art designs, let me know in the comments section below. You can also communicate with me on Facebook and Instagram. Enjoy!!!
Feb 4, 2014
Valentines Series: Nail Art using Revlon's Stencils
Welcome to the 100th blog post of Nails Context. Yes you read it right, 100th :) Can't believe it. Feels like just yesterday when I started my blog. Also in case you are following Nails Context on Instagram, you must know I recently reached 1000 followers on Instagram.
Now about today's post, I recently came across Nail art stencils from Revlon at a drug store and decided to give them a try. I bought the heart nail art stencils and decided what better time than Valentine's Day to try them out. So for the following cute Valentine's Day nail art that you see, the hearts I did are by using the Stencils and the dots are done by using a dotting tool.
I will post a pictorial (tutorial in pictures) tomorrow, so you get to see how easy it was to do this nail art. The polishes that I have used here are - Red is Chanel's Dragon, Pink is Revlon's Cupid and White is Butter London's Cotton Buds.


Feb 2, 2014
Valentines Series: Hearts It Is
Hello All. Is it me or is 2014 already running by so fast. Cannot believe its Feb already. We all know what Feb means, isn't it. It means Valentines Day. And what defines Valentine's Day better than hearts. So today's nail art is what I wore, on my nails, last year for Valentine's Day (hence the lack of better pictures).

The polishes that I have used are Revlon's Cupid and Plum Seduction.

I did similar nail art for my Sister's feet last year for Valentines Day. Below is a picture of that. It shows how you can recreate same nail art on both hands and feet.

Hope you all like it. Have a wonderful month of February.

The polishes that I have used are Revlon's Cupid and Plum Seduction.

I did similar nail art for my Sister's feet last year for Valentines Day. Below is a picture of that. It shows how you can recreate same nail art on both hands and feet.

Hope you all like it. Have a wonderful month of February.
Subscribe to:
Posts (Atom)