
Mar 31, 2015
MonthlyManiFavorites: March 2015
Hi All, its been a while since I posted the Monthly Mani Favorites on the Blog. I usually post them on my social media - Facebook, Instagram, Twitter and Google+. Here are my nail art favorites from the blog this month, which ones are yours? Let me know in the comments section below and dont forget to follow NailsContext on your favorite social media platform :)

Mar 30, 2015
Product Review: Jamberry Nail Wraps
Hi All, I was recently approached by a jamberry consultant Bertina, to review nail wraps for them. I agreed and I was provided with some very pretty nail wraps to review. Now those of you don't know, Jamberry nail wraps are sold through independent consultants (like my friend Bertina) and have a basic cost of $15/sheet, with enough wraps for 2-3 applications, depending on how you allocate them. They work for both fingers and toes. For this review, I didn't try them on my toe nails but on my fingernails. Nail Polish used on my other finger nails is Sally Hansen's Chic Pink.

Applying this nail wraps is pretty easy.
1. Clean unpolished nails with alcohol wipes and push back the cuticles.
2. Match nail to the nail wrap that best fits.
3. Peel off nail wrap and warm with a blow-dryer or mini-heater for 3-5 seconds or until soft and flexible.
4. When warm, press the wrap onto the nail. Apply firm pressure around the edges to adhere the wrap to the nail. Use rubber cuticle pusher to seal the wrap around the base of the cuticle.
5. Trim the top with scissors and file off remaining warp to remove the excess.
6. Apply heat and pressure to the wrap again until it is bonded to the nail.
To purchase them, you can go to Bertina's website by clicking HERE.
To remove these nail wraps is pretty easy too. All I had to do was, to peal off the wrap from where it was coming off and the use nail polish remover to clean the nails.
Below is my personal review of how these nail wraps faired on my 7-Day trial of them. Now some of you think that since I have perfect nails all the time, I sit around pretty through out the day. Which is not true, being a software engineer, my fingers are typing on the computer all day long. After that at home I am doing regular chores like cooking, cleaning, dusting, dishes, laundry, etc, like any other regular woman. So these nail wraps survived all these activities on the 7-Day trial and this is now they faired:
This is what nail wrap looked like on my nails on Day 1, I applied them on my middle and ring finger:

This is how they looked like on Day 4, still going pretty strong.

On Day 6, the wrap started wearing off from the tips of the nails.

On Day 7, I could see the wrap coming off from corners.

After Day 7, I took off the nail wrap as mentioned above. I must say I was pretty impressed by these nail wraps. My previous experience with leading polish brand nail wraps haven't been good and that's why you never see my posting any nail wrap pics on my Blog. If you are looking for an easy way to decorate your digits without going through a lot of trouble of painting and designing your nails with polish, this is the perfect solution for you. And after 6-7 days you can always change them to other pretty designs that Jamberry has to offer. I am pleased with them so far and will definitely be using more of their wraps on my nails again.
Disclaimer: I was provided with these products free of charge for the purpose of this post. The opinions mentioned are my own.
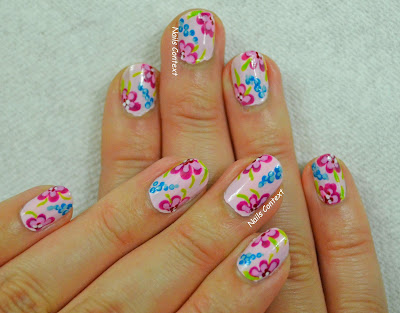
Mar 27, 2015
It's Spring
Spring is upon us and what better way to start the season than with a pretty Spring Nail Art. To see the inspiration behind the nails, head over to my Instagram account. In the mean time enjoy some lovely Spring Nail Art. Thanks so much for visiting, and be sure to subscribe via email so you never miss a post! You can also follow me on Instagram for more every day pictures. Have a great weekend~! XOXO


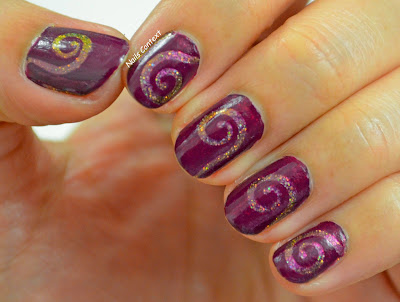
Mar 24, 2015
Multiple Swirls.
You all must remember my Swirls Nail Art from last time (To see it, click HERE) I decided to recreate the Swirls this time with a different design. You all can easily create these Swirls by following my tutorial from HERE.


Mar 20, 2015
Fish-scale
Trying some more color combinations. This time it is turquoise and pink. Polishes used are - Urban Outfitter's Flip Flop and Victoria Secret's Wild Side. You can there swatches HERE and HERE. Fish-scale pattern is done free hand, using a very thin nail art brush.


Mar 17, 2015
St. Patrick's Day 2015
Happy St. Patrick's Day everyone. Today on the occasion of St. Patrick's Day, I am sharing my St. Patrick's day, green nail art with you all. I used different green shades to create this nail art, Revlon's Emerald City, Butter London's Jaded Jack and OPI's Skip the gift Wrap.

For this look, I started first by painting my nails with base white color. I used OPI's My Boyfriend Scales the Walls. Then using a sponge I dabbed some light green polish (Butter London's Jaded Jack) to the tips of my nails. Then using a very thin nail art brush, I painted vines and shamrock leaves. How do you like the outcome? St. Patrick's Day worthy?


To see my St. Patrick's Day nail art from last year, click Here. Hope you all have a wonderful day and don't forget to wear Green.

Mar 15, 2015
Tutorial: Swirls
Hi All, Since you all has so many questions about my Swirls nail art from few days ago, that I decided to post a tutorial in pictures to show you all how to do it. For this nail art I used Polishes from Fun Lacquer's Celebrate(H) and Sinful Color's Get It On.

STEP 1: I painted my nails with Base coat of Fun Lacquer's Celebrate(H).

STEP 2: Then I added swirl nail vinyls from Twinkled T to create the perfect swirls.

.jpg)
STEP 3: After making sure that the swirl nail vinyl was properly secure, I added two coats of Sinful Color's Get It On

STEP 4: Then immediately are removed the swirl nail vinyl to reveal a multichrome swirl beneath it.

STEP 5: Then using nail polish remover I cleaned the excess polish around the nails and added some nice glossy top coat on top of it. Then repeated the same procedure with all the nails to reveal this:
Isn't it super easy to do this nail art? Try it at home and send me the pics :) To see the original nail art, click HERE.

STEP 1: I painted my nails with Base coat of Fun Lacquer's Celebrate(H).

STEP 2: Then I added swirl nail vinyls from Twinkled T to create the perfect swirls.

.jpg)
STEP 3: After making sure that the swirl nail vinyl was properly secure, I added two coats of Sinful Color's Get It On

STEP 4: Then immediately are removed the swirl nail vinyl to reveal a multichrome swirl beneath it.

STEP 5: Then using nail polish remover I cleaned the excess polish around the nails and added some nice glossy top coat on top of it. Then repeated the same procedure with all the nails to reveal this:

Isn't it super easy to do this nail art? Try it at home and send me the pics :) To see the original nail art, click HERE.
Mar 13, 2015
Swirls
For today's nail art I decided to create some multichrome swirls. Polishes used are Fun Lacquer's Celebrate(H) and Sinful Color's Get It On. I used swirl nail vinyls from Twinkled T to create the perfect swirls. What do you think? Like it? I will post a tutorial soon on how to achieve this nail art look.


Ring: Chloe and Isabel by Sony 


Mar 11, 2015
Holographic Color Blocking
You must remember me swatching some amazing holographic and multi chrome nail polishes from Fun Lacquer last week. I couldn't get enough of those polishes and decided to create a color blocked nail art with them. I used Fun Lacquer's EVENING GOWN and BLESSING(H) to create this nail art and added some gold dots in between. You can see swatches of these polishes HERE.


What do you all think? Did you like this look?


What do you all think? Did you like this look?
Mar 9, 2015
Red and Mint
Today I continue to experiment with some different color combo's and pattern's. Color's today are Mint (Revlon's Mint) and Red (Chanel's Dragon) while trying some free-hand pattern's.


Mar 4, 2015
Fun Lacquer Nail Polish
I recently bought some very fun nail polishes from fun lacquer and HAD to share their swatches with you all.
The first one is called BLESSING(H). This nail polish is from their New Year 2015 collection. It’s a very pretty multichrome polish that has holographic sparkles added to it. There are so many shades you can find in this polish, that it’s amazing. With the change of light you will purple, blue, green and teal. It's a real shade shifter. I used 3 coats for the pictures below, without any base coat.


The second one is called CELEBRATE(H). This is from fun lacquer’s New Year 2015 collection too. It’s a pretty multichrome too and the holographic sparkle adds a fun dimension and are more visible in this particular shade.


The third one is called EVENING GOWN. It’s a beautiful linear “holographic” polish from their Summer 2014 collection. This polish looks lovely, especially under sunlight, just like a sparkly purple evening gown.


I am in love with all the shades of Fun Lacquer so far. Will definitely be buying more of them. You can purchase Fun Lacquer polishes either on their website or from LIVE.LOVE.POLISH. Also see some other Holographic polishes swatched by me before, here.
Enjoy!!!

Mar 2, 2015
Red and Blue
A Simple nail art that I did at the beginning of the year and couldn't share it until now. The polishes used are Chanel's Dragon, Wet-n-Wild's A need a refresh-mint and Butter London's Cotton Buds.


Subscribe to:
Posts (Atom)